


Transform Your Floral Experience with 3 Easy Preservation Tips
Posted on 29/06/2025
Transform Your Floral Experience with 3 Easy Preservation Tips
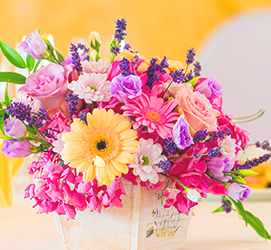
Few things brighten a space, mark a special moment, or express deep emotion like a beautiful bouquet of fresh flowers. However, the fleeting beauty of florals can sometimes leave us wishing their splendor could last a little bit longer. Want to savor your gorgeous blooms beyond their natural lifespan? *Transforming your floral experience starts with learning effective and easy ways to preserve flowers at home.* In this comprehensive guide, you'll discover three simple floral preservation techniques--from air drying to pressing and wax dipping--that can help your favorite blossoms remain captivating for weeks, months, or even years. Whether you're cherishing a wedding bouquet, a thoughtful gift, or a home arrangement, these floral tricks are practical, enjoyable, and suitable for anyone!

Why Should You Preserve Flowers?
Flowers symbolize love, memory, joy, and celebration. By proactively preserving blooms, you unlock the ability to:
- Sustain sentimental value: Hold onto precious memories attached to special occasions.
- Decorate sustainably: Use long-lasting blossoms in home decor, eliminating the need to purchase fresh ones frequently.
- Create unique mementos or gifts: Customized keepsakes can be made from preserved flowers, such as shadow boxes, art pieces, bookmarks, and more.
- Reduce waste: Preserving fresh flowers extends their usefulness and minimizes environmental impact.
Ready to dive into how to preserve your fresh blooms at home? Let's explore three effective methods--each with its benefits, suitable flower types, and step-by-step instructions.
1. Air Drying: The Classic, Effortless Floral Preservation Method
*Why Choose Air Drying?*
Air drying is the most traditional and accessible way to preserve flowers. This technique works exceptionally well for robust, low-moisture blossoms such as roses, lavender, baby's breath, strawflower, and eucalyptus.
Benefits of Air Drying Flowers
- Simple and Cost-effective: No special equipment or materials needed.
- Natural Appearance: Retains a rustic, vintage charm--perfect for boho chic or country-inspired decor.
- Minimal Maintenance: Once dried, flowers require little care and can last for months or years.
How to Air Dry Flowers: Step-by-Step Guide
- Pick flowers at their peak: Select blooms that are just about to fully open for best results. Remove excess foliage to avoid mold.
- Create small bundles: Gather flowers of the same kind or complimentary varieties. Use a rubber band or twine to tie the stems together.
- Hang upside down: Suspend the bundles in a dark, dry, and well-ventilated space (like a closet or attic). Hanging preserves stem shape and prevents petal droop.
- Wait patiently: Drying typically takes 2-4 weeks. Check for crispness before removing.
- Preserve and display: Once completely dry, spritz lightly with unscented hairspray for extra longevity. Arrange in vases, frames, or shadow boxes.
Pro Tip: Combine dried flowers with pampas grass, feathers, or foliage for an effortlessly elegant statement piece.
2. Pressing Flowers: Capture Color & Detail for Artful Keepsakes
Why Try Flower Pressing?
If you want to preserve floral color, shape, and fine details, pressing is your go-to method. Pressed flowers are versatile for crafting, scrapbooking, or framing. Delicate blooms like pansies, violets, daisies, ferns, and even petals from roses or sunflowers press beautifully.
Advantages of Flower Pressing
- Conserves color and detail: Maintains vibrant hues and intricate petal patterns.
- Ideal for creative projects: Pressed flowers are perfect for DIY bookmarks, greeting cards, wedding invitations, or wall art.
- Space-saving: Flattened blossoms are easy to store or display in small spaces.
How to Press Flowers: Step-By-Step Instructions
- Choose fresh, clean blooms: Pick flowers without blemishes or dewdrops.
- Prepare your pressing surface: Lay the flowers flat between two pieces of absorbent paper (parchment, coffee filters, or paper towels).
- Apply pressure: Place paper-enclosed flowers in a heavy book. Add extra weight--stack more books or a brick on top for best results.
- Wait for perfection: Keep in a dry space and allow about 2-3 weeks for complete drying. Swap out damp paper as needed.
- Display creatively: Use tweezers to gently remove pressed blooms. Arrange in frames, attach to cards, or seal on candles and glassware.
Creative Suggestion: *Use pressed florals to create bespoke decor or meaningful handmade gifts--it's a personalized way to celebrate cherished moments!*
3. Wax Dipping: Preserve Flowers with Gloss & Flexibility
What is Wax Dipping and Why Use It?
If you're after a technique that maintains a flower's shape, color, and a *touch of softness*, wax dipping is for you. This preservation method provides blossoms with a subtle sheen and seals in their natural texture. Flowers like roses, camellias, small peonies, and carnations respond excellently to this process.
Benefits of Wax Dipping Blooms
- Locks in freshness: Preserves vibrant, almost "fresh-cut" appearance for weeks.
- Creates flexible petals: The wax coat keeps flowers soft to the touch--not brittle like drying or pressing methods.
- Adds a glossy accent: Provides an elegant, professionally preserved look ideal for events or decor.
Wax Dipping Flowers: A Simple Guide
- Pick your blossoms: Choose fully open, blemish-free flowers. Gently pat dry any dampness.
- Melt paraffin wax: In a double boiler, gently heat paraffin wax (available at craft stores) until it's fully liquid. Don't overheat; keep at about 130-150?F (54-65?C).
- Dip the flowers: Hold the stem and dip each flower head into the melted wax. *Quickly remove*--don't submerge too long or petals may wilt.
- Shake and cool: Gently shake off excess wax and hang the flower upside down or place on wax paper to set.
- Display or store: Once wax is hard, arrange blooms as desired or store in a cool, dry box to prevent sticking.
Safety Reminder: Always supervise the melting process and avoid overheating wax. Work in a ventilated area away from open flames.
Bonus: Tips for Long-Term Flower Preservation Success
- Handle with care: Even preserved flowers are delicate--minimize handling whenever possible.
- Shield from direct sunlight: Excess light can fade both dried and pressed blooms. Display in spots away from UV rays.
- Avoid humidity: Store or display your preserved flowers in dry environments to prevent mold or decay.
- Dust gently: Use a soft brush or a gentle blast of air (like from a can of compressed air) to remove dust without damaging petals.
How to Choose the Right Flower Preservation Technique
Each floral preservation technique offers unique results. Here's how to decide:
- Air drying: Best for bouquets and arrangements intended for vases, wreaths, or rustic craft projects.
- Pressing: Ideal for capturing flora in permanent two-dimensional form--perfect for scrapbookers, crafters, and those who love minimalist art.
- Wax dipping: Choose this for keepsakes that must retain their three-dimensional beauty and slightly soft texture.
Think about the end use and preferred look of your preserved flowers: Are you crafting for display, framing, or gifting? Each method brings its charm to your floral experience!
Frequently Asked Questions about Floral Preservation
What flowers preserve best?
- Best for Air Drying: Roses, lavender, statice, baby's breath, celosia, thistle.
- Best for Pressing: Pansy, violet, daisy, fern, cosmos, larkspur.
- Best for Wax Dipping: Rose buds, small peonies, carnations, camellias.
Can I combine preservation methods?
Yes! Some crafters air dry larger flowers and press smaller ones from the same bouquet for a multidimensional arrangement. Get creative and experiment for unique results.
How long do preserved flowers last?
With proper care, air dried and pressed flowers last several months to a few years, while wax-dipped blooms typically stay fresh-looking for up to a month. Always avoid humidity and direct sun to maximize lifespan.
Is there a way to preserve flowers instantly?
While these three methods are easy and require minimal tools, urgent preservation needs can be met with commercial silica gel drying or professional freeze-drying. These are more advanced (and costly) but worth considering for highly valuable florals.

Embrace the Joy of Preserved Flowers
Flowers don't have to be fleeting. By incorporating these easy preservation tips for fresh flowers into your routine, you can enjoy their beauty and significance far beyond their natural lifespan. From rustic dried bouquets to artfully pressed keepsakes and stunning wax-dipped displays, transforming your floral experience is both fun and deeply rewarding.
Start experimenting today with one--or all--of these methods. Whether you wish to immortalize a bridal bouquet, gift a heartfelt token, or simply decorate your space in a sustainable way, preserved flowers offer endless creative opportunities.
Preserving your blooms is more than just a DIY project--it's a way to honor memories, emotions, and the enduring elegance of nature in your daily life!
Ready to Transform Your Floral Experience?
- Experiment with air drying robust, oversized blooms for rustic arrangements.
- Press delicate, colorful blossoms for artistic creations and heartfelt gifts.
- Wax dip your favorite roses to keep their beauty shining week after week.
Give these preservation techniques a try and watch your floral memories bloom forever!